How to Use Llama 3 Self-Hosted
An overview of Meta Llama 3 and detailed guide on how to run the LLM on your own cloud compute or locally with simple Python.

Engineer @ 🏃♀️Runhouse🏠

CEO @ 🏃♀️Runhouse🏠
Introduction
Whether you’re an ML expert or a novice looking to tinker with the Meta Llama 3 model on your own, Runhouse makes it easy to leverage the compute resources you already have (AWS, GCP, Azure, local machine, etc.) and run Llama 3 with minimal setup.
In this guide, we’ll start with an overview of the Llama 3 model as well as reasons for choosing an open LLM versus a proprietary model such as ChatGPT. Then we’ll dive into an example on running Llama 3 privately on your own infrastructure using Runhouse. Our main example uses Hugging Face Transformers and deploys to AWS but this article offers additional code snippets for serving with TGI and vLLM. We’ll also cover ways to deploy to other cloud providers (GCP and Azure) and to your local machine.
Meta Llama 3
This past April, Meta announced the latest version of their open large language model (LLM), Llama 3. The new model has impressive benchmarks and has challenged the assumption that proprietary models will always offer superior performance compared to open ones.
Before getting into the specifics of running Llama 3 yourself, we’ll go over a brief review of the model’s capabilities and the tradeoffs between open and proprietary LLMs. We’ll also cover an overview of the available model variants.
Llama 3 Performance
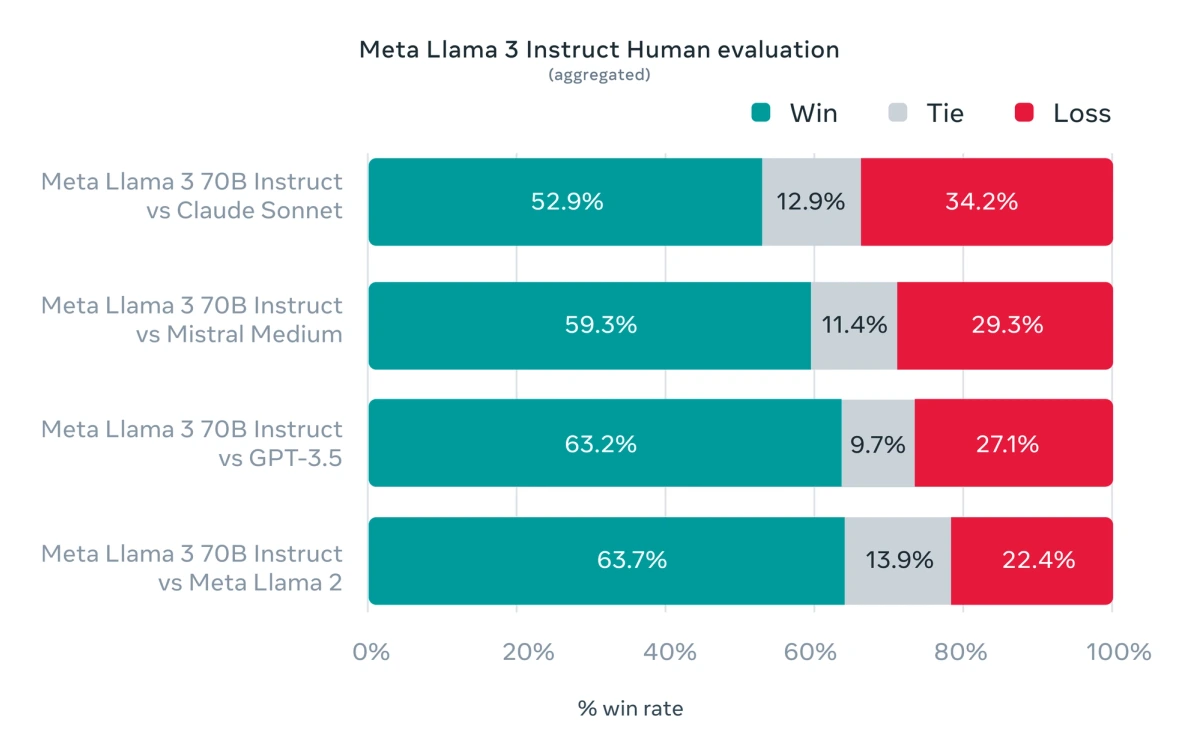
The latest generation of Llama models from Meta demonstrates impressive performance and has expanded the range of possibilities with open LLMs. The larger 70B model has even out-performed GPT-3.5 in Meta’s evaluations. Meta has benchmarked the model against both open and proprietary models such as Claud and Mistral. We encourage you to read more of the details from Meta’s official announcement.
Note that we’ll be using the smaller 8B parameter model in this guide. To host the 70B model, you can easily update our scripts to use more powerful virtual machines on your preferred cloud provider, but the cost is significantly higher.
Open v. Proprietary Models
You’ve likely tried proprietary models such as OpenAI’s ChatGPT, Anthropic’s Claude, or Google’s Gemini, which are easily accessible with intuitive chat interfaces and well-documented APIs. These companies focus on delivering a powerful tool that can handle a wide variety of uses. The underlying models for each are completely private and can only be interacted with using their APIs and tools. Of course, there are tradeoffs that come from closed, proprietary models, such as:
- Data is sent through a third party API to interact with the model, leading to privacy concerns by potentially sharing sensitive data with a model hosting company.
- The cost of inference is strictly controlled by the model’s owner, allowing for little or no control over your spending.
- Models can be updated at unpredictable intervals potentially produce inconsistent results, a concern for environments where reproducibility is crucial.
- Most proprietary models offer no way to fine-tune the model to fit your needs, though some are experimenting with options in this space.
Especially for enterprise use cases, concerns associated with closed models can be a nonstarter. Businesses typically need more control over data security, reproducible results, observability, and options for cost optimization.
Open models such as Meta Llama 3 can be downloaded directly and used privately. This means that you don’t need to send any data through a third party API and you can host the model and run inference on your own infrastructure. It’s more upfront work to deploy your model, and that’s something we’re solving with Runhouse. Scarcity and cost of hosting GPUs can also be a concern.
| Open | Proprietary | |
|---|---|---|
| Cost | Based on your selected infrastructure with higher base costs but more controlled scaling | Controlled by model’s owner though typically less expensive for minimal use cases |
| Reproducibility | Full control over any changes to the underlying model | Unreliable since changes to the model can be unpredictable |
| Flexibility | Can be fine-tuned for specific tasks | Rigid |
| Setup Requirements | Complex (without Runhouse) | Simple (Easy-to-use APIs) |
| Data Privacy | Owned entirely by you | Accessible by third party |
Breakdown of the tradeoffs between Open and Proprietary LLMs
Pre-Trained and Instruction Tuned Models
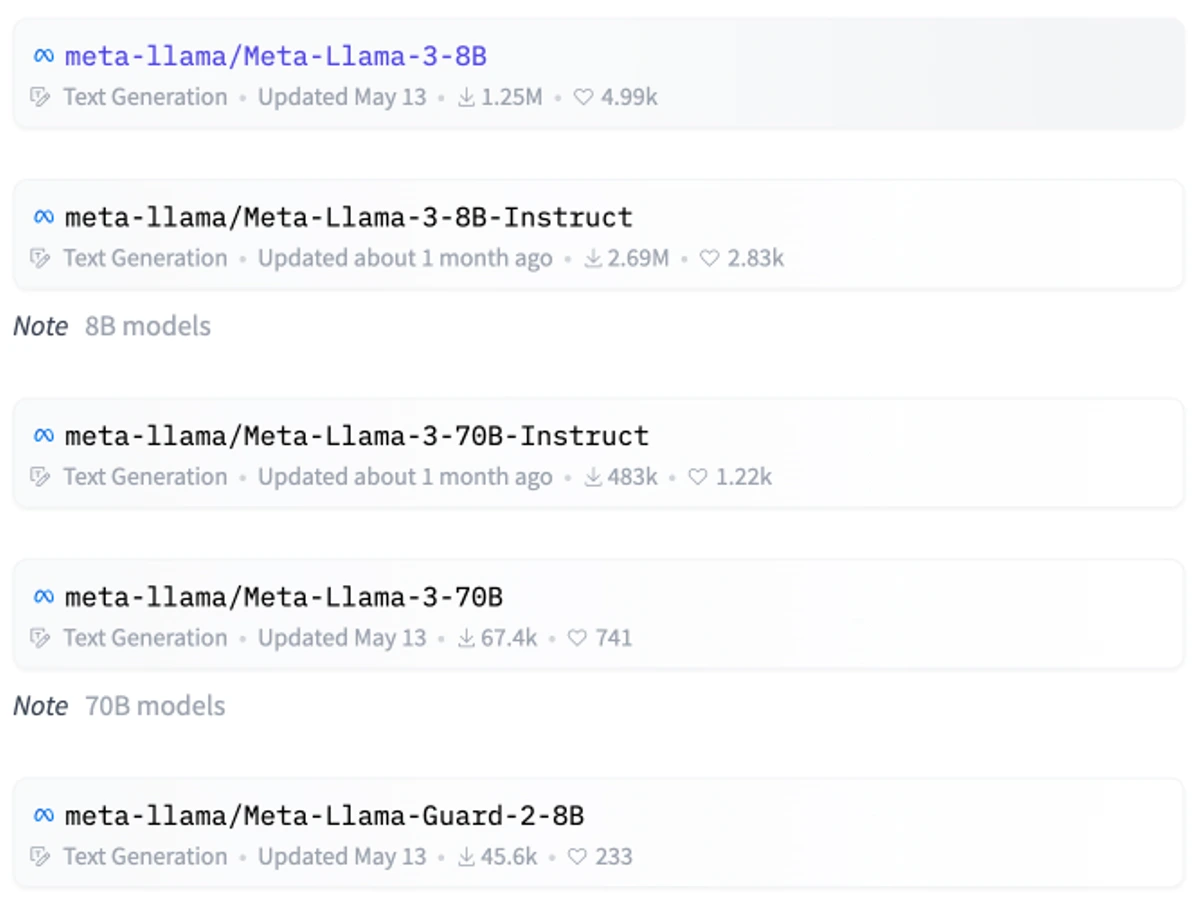
You’ll notice there are a few different Llama 3 models available for download on Hugging Face. The models are offered in two sizes – 8B and 70B parameters – each in pre-trained and instruction tuned variants. The model size directly affects how much compute you’ll need to run inference.
If you’ve used ChatGPT and other AI tools, you’re familiar with typical chat interfaces. However, on a basic level, LLMs work by predicting the most likely text in a sequence with no special awareness of questions or answers. If you ran inference with a question directly to a pre-trained model, the LLM might respond with a list of similar questions. By training a model to use a prompt format, it can produce answers more appropriate for a chat UI.
# Standard question
"Why did the chicken cross the road?"
# Prompt format (approximated)
"User: Why did the chicken cross the road? AI Assistant:"
Llama 3 Instruct models are tuned to better handle the prompting format, making them ideal for chat interfaces and anything involving questions and answers. We’ll use the smaller Llama 3 8B Instruct model for our examples. Many tools, such as the Hugging Face transformers library (that we’ll use in this tutorial), include methods to apply chat templates.
How to Use Llama 3 with Runhouse
In this guide, we’ll describe how you can deploy a Llama 3 8B Instruct Model on AWS using Runhouse. If you’d like to dive right into the code, please skip ahead to our example tutorial. Trying to deploy on a different provider like Google Cloud Platform (GCP) or Azure? Be sure to skip ahead to the section describing initialization of each as well as recommended compute resources to deploy.
Runhouse is an open source Python package that enables you to easily develop, debug, and run code on your own compute. Compatible with AWS, GCP, Azure, and more, Runhouse is particularly useful for rapid ML development by efficiently utilizing your GPUs and CPUs. With a quick setup and a few lines of Python code, you’ll be able to run inference on your own Llama 3 model.
Install Runhouse & configure your cloud provider
We’ll start by installing the Runhouse CLI and Python library via the terminal. The primary example in this post will use a version of the package with AWS tooling included.
$ pip install "runhouse[aws]"
If you haven’t configured AWS on your system yet, you’ll additionally need to run the following commands to set up your access key and confirm that deploying to AWS is enabled via SkyPilot.
$ aws configure
$ sky check
We’ll be using Hugging Face to load the Meta Llama 3 model. Before doing so, you’ll need to sign the waiver on the model page, wait for approval via email (typically less than an hour), and create a Hugging Face token with read access to the model. After creating your access token, you will need to export it to be used by Runhouse. This token will be loaded remotely as a builtin secret provider huggingface.
$ export HF_TOKEN=<your huggingface token>
Next, we’ll walk through one method for serving the Meta Llama 3 model and how you can use Runhouse to create a module class for using Hugging Face Transformers.
Llama 3 Chat Module with Hugging Face Transformers
One of the most popular ways to serve LLMs is with Hugging Face Transformers. This library offers an easy-to-use interface for working with many open models including Llama.
Since we don’t take ourselves too seriously, we’ll configure the model to respond like a pirate, but we encourage you to find a more (or far less) practical application for Llama 3.
class HFChatModel:
    def __init__(self, model_id="meta-llama/Meta-Llama-3-8B-Instruct", **model_kwargs):
        super().__init__()
        self.model_id, self.model_kwargs = model_id, model_kwargs
        self.pipeline = None

    def load_model(self):
        import transformers

        self.pipeline = transformers.pipeline(
            "text-generation",
            model=self.model_id,
            model_kwargs=self.model_kwargs,
            device="cuda",
        )

    def predict(self, prompt_text, **inf_kwargs):
        if not self.pipeline:
            self.load_model()

        messages = [
            {
                "role": "system",
                "content": "You are a pirate chatbot who always responds in pirate speak!",
            },
            {"role": "user", "content": prompt_text},
        ]

        prompt = self.pipeline.tokenizer.apply_chat_template(
            messages, tokenize=False, add_generation_prompt=True
        )

        terminators = [
            self.pipeline.tokenizer.eos_token_id,
            self.pipeline.tokenizer.convert_tokens_to_ids("<|eot_id|>"),
        ]

        outputs = self.pipeline(
            prompt,
            max_new_tokens=256,
            eos_token_id=terminators,
            do_sample=True,
            temperature=0.6,
            top_p=0.9,
        )
        return outputs[0]["generated_text"][len(prompt) :]
The HFChatModel class serves as an interface for “chatting” with (performing inference on) Llama 3.
Deploy the remote Llama 3 model
To start using our HFChatModel we’ll need to run a script that sets up the module on a remote cluster. The following sections will need to be run within a if __name__ == "__main__": block to ensure it isn’t run remotely by Runhouse when the script is imported during deployment.
if __name__ == "__main__":
    # Define an Image with packages to install on the cluster
    img = rh.Image(name="llama3inference").install_packages(
        [
            "torch",
            "transformers",
            "accelerate",
            "bitsandbytes",
            "safetensors>=0.3.1",
            "scipy",
        ]
    )

    # Create a cluster with the desired accelerators and provider
    gpu = rh.cluster(
        name="rh-a10x", accelerators="A10G:1", memory="32+", provider="aws", image=img
    ).up_if_not()

    gpu.sync_secrets(["huggingface"])  # Needed to download Llama 3 from Hugging Face

    # Define our module and run it on the remote cluster
    RemoteChatModel = rh.module(HFChatModel).to(gpu, name="HFChatModel")
    remote_hf_chat_model = RemoteChatModel(
        torch_dtype=torch.bfloat16, name="llama3-8b-model"
    )

    # Calling our remote function
    while True:
        prompt = input(
            "\n\n... Enter a prompt to chat with the model, and 'exit' to exit ...\n"
        )
        if prompt.lower().strip() == "exit":
            break
        output = remote_hf_chat_model.predict(prompt)
        print("\n\n... Model Output ...\n")
        print(output)
For a more detailed explanation of each of these steps, please refer to our full Llama 3 on AWS example. The example includes a link to Github with Python code that you can run directly on your machine.
Running the code above will complete the following steps:
- Initializing a fresh virtual machine on AWS EC2 using SkyPilot
- Creating the
envwe defined and installing any dependencies (this may take a while especially for larger libraries liketorch) - Loading the Llama 3 model from Hugging Face
- Asking you to send a prompt to the model
- Running inference and returning a result
Let's run the script. When the model is ready, you can enter prompts right in your terminal.
... Enter a prompt to chat with the model, and 'exit' to exit ...
On a 2023 MacBook Air, this process took me approximately 6 minutes (most of which was allocated to spinning up the cluster). Subsequent runs will be on the scale of seconds, since the cluster is already running and configured - unless you set an auto-stop or have terminated the cluster via sky down.
When you’re finished with the model, you can use SkyPilot’s sky status and sky down <id> commands to check and terminate your cluster. This will ensure you aren’t paying for unused compute power.
Clusters
NAME     LAUNCHED     RESOURCES                        STATUS  AUTOSTOP  COMMAND
mk-a10x  44 mins ago  1x AWS(g5.2xlarge, {'A10G': 1})  UP      (down)    llama3_ec2.py

Managed spot jobs
No in progress jobs. (See: sky spot -h)

Services
No existing services. (See: sky serve -h)
Output sample from sky status.
Serving Alternatives: TGI and vLLM
Depending on your individual use case, you may want to consider other options for running inference on Llama 3. Hugging Face Transformers is popular and easy to set up, but TGI (also from Hugging Face) and vLLM can serve as more performant alternatives.
Since Runhouse can deploy any Python code to your virtual machines, we can adjust our Module to leverage these (or any other) libraries.
Serving Llama 3 with TGI
For improved performance, you may want to use Hugging Face’s TGI toolkit to serve the LLM instead of the popular transformers library from our example. TGI offers many optimizations that could appeal to your production use cases.

We’ll define a new Runhouse Module that uses TGI to serve the same Llama 3 8B Instruct model as the example above. This Module will serve as a wrapper to deploy TGI as a Docker container on our cluster that will be wired up to port 8080 to be easily accessed via HTTP requests or curl using the Messages API. Alternatively, you could skip the open_ports and SSH into the cluster for improved security.
class TGIInference:
    def __init__(...):
        # See full example
        ...

    def _load_docker_client(self):
        # See full example
        ...

    def _model_is_deployed(self):
        # See full example
        ...

    def deploy(self):
        # Adapted from: https://huggingface.co/docs/text-generation-inference/quicktour
        import docker

        if self._model_is_deployed():
            return

        print("Model has not yet been deployed, loading image and running container.")

        home_dir = str(Path.home())
        data_volume_path = f"{home_dir}/data"

        device_request = docker.types.DeviceRequest(
            count=-1,
            capabilities=[["gpu"]],
        )

        start_time = time.time()
        timeout = 600

        # Load the HF token which was synced onto the cluster as part of the env setup
        hf_secret = rh.secret(provider="huggingface")
        hf_token = hf_secret.values.get("token")

        model_cmd = (
            f"--model-id {self.model_id} "
            f"--max-input-length {self.max_input_length} "
            f"--max-total-tokens {self.max_total_tokens}"
        )

        # Add any other model kwargs to the command
        # https://github.com/huggingface/optimum-neuron/tree/main/text-generation-inference#choosing-service-parameters
        for key, value in self.model_kwargs.items():
            model_cmd += f" --{key} {value}"

        container = self.docker_client.containers.run(
            self.image_uri,
            name=self.container_name,
            detach=True,
            ports={"80/tcp": self.container_port},
            volumes={data_volume_path: {"bind": "/data", "mode": "rw"}},
            command=model_cmd,
            environment={"HF_TOKEN": hf_token},
            device_requests=[device_request],
            shm_size="1g",
        )

        print("Container started, waiting for model to load.")

        # Wait for model to load inside the container
        # See full example
        ...
To deploy this module you’ll need to update the initialization script. For more information and runnable Python code please visit our Llama 3 with TGI example.
Serving Llama 3 with vLLM
Alternatively, you can use vLLM to serve the Llama 3 model. vLLM is designed for higher throughput than both Transformers or TGI and may be a better option for a high-demand application. There are still many tradeoffs that you should consider for your specific project and we encourage you to read through vLLM’s documentation.
To implement vLLM in place of Transformers, we’ll need a new Runhouse Module and script used to interact with the model. Below is a snippet from a class that loads a vLLM engine with Llama 3 and runs inference with a generate method. Note that this example would need additional logic for a chat interface using prompt templates.
class LlamaModel:
    def __init__(self, model_id="meta-llama/Meta-Llama-3-8B-Instruct", **model_kwargs):
        super().__init__()
        self.model_id, self.model_kwargs = model_id, model_kwargs
        self.engine = None

    def load_engine(self):
        from vllm.engine.arg_utils import AsyncEngineArgs
        from vllm.engine.async_llm_engine import AsyncLLMEngine

        args = AsyncEngineArgs(
            model=self.model_id,  # Hugging Face Model ID
            tensor_parallel_size=1,  # Increase if using additional GPUs
            trust_remote_code=True,  # Trust remote code from Hugging Face
            enforce_eager=True,  # Set to False for production use cases
        )
        self.engine = AsyncLLMEngine.from_engine_args(args)

    async def generate(self, prompt: str, **sampling_params):
        from vllm.sampling_params import SamplingParams
        from vllm.utils import random_uuid

        if not self.engine:
            self.load_engine()

        sampling_params = SamplingParams(**sampling_params)
        request_id = random_uuid()
        results_generator = self.engine.generate(prompt, sampling_params, request_id)

        # See full example
        ...
For the full, runnable Python file and more information, please visit our Llama 3 with vLLM example. This example deploys to GCP and can serve as a helpful comparison to see how Runhouse works with various cloud providers.
Run Llama 3 on Any Cloud or Locally
Runhouse allows you to easily deploy the same module on any cloud infrastructure. All we need to do is update the Runhouse installation and make minor changes to the cluster definition in our deployment script.
To make sure that you have the proper credentials set up for each of these providers, please run sky check to check before attempting to run the code.
Run Llama 3 on Google Cloud Platform (GCP)
Running on GCP is as simple as updating the Runhouse package installation and modifying the definition of your cluster. First, re-import Runhouse with GCP and initialize your Google Cloud account.
$ pip install "runhouse[gcp]"
$ gcloud init
# Run this if you don't have a credentials file.
$ gcloud auth application-default login
$ sky check
Read more about configuring GCP via SkyPilot’s documentation.
Next, update the cluster definition to target gcp as the provider and L4:1 accelerators. This is a GPU model generally available on GCP and appropriately sized for running the Llama 3 model.
gpu_cluster = rh.cluster(
    name="rh-l4x",
    accelerators="L4:1",
    memory="32+",
    provider="gcp",
)
And that’s it! You should otherwise be able to run the script just as we did in the AWS example above.
Run Llama 3 on Microsoft Azure
To run the module we define above on Azure, all you need to do is update the Runhouse package and modify the definition of your cluster. First, re-import Runhouse and initialize your Azure account settings.
$ pip install "runhouse[azure]"
# Login
$ az login
# Set the subscription to use
$ az account set -s <subscription_id>
$ sky check
Read more about configuring Azure via SkyPilot’s documentation.
We’ll update the cluster definition provider to be azure and can use the same accelerators as above. A10s are generally available on Azure and AWS.
gpu_cluster = rh.cluster(
    name="rh-a10-azure",
    accelerators="A10:1",
    memory="32+",
    provider="azure",
)
You can now run your script with the updated cluster definition.
Local Llama 3
There are few reasons you might want to run Llama locally. You may simply want to run it on your laptop for personal offline usage, and not bother with cloud VMs and accelerators. For that, there are several excellent options offering accelerated, out of the box support for many common personal computing architectures, including Ollama, llama.cpp (performance-focused and written in C++) and LM Studio (includes an easy-to-use UI).
Another common use case for local execution is incorporating Llama 3 into an existing application like a FastAPI app. Running a single inference is straightforward but the memory, latency, and concurrency considerations of serving an application like this can be tricky. You want to ensure that calls to the model are multiplexed to take advantage of paging systems like vLLM, which are far more efficient than servicing calls one by one. You also may want to take advantage of replication by creating multiple workers for your overall app but don’t want to replicate the model itself many times in memory (or restart vLLM with each replica).
Runhouse can send a vLLM module into a separate process shared by your replicas using the rh.here method. This is a super simple way to ensure efficient multiplexing, clear concurrency handoffs, and no memory duplication. Assuming we’re on a GPU box, we can reuse our vLLM LlamaModel above as-is (and if not, we can use transformers or some of the local options above):
# my_llama_app.py

from contextlib import asynccontextmanager
from fastapi import FastAPI
from vllm_modules import LlamaModel  # Runhouse Module from our vLLM example
import runhouse as rh

LLM = None

DEFAULT_SAMPLING_PARAMS = { "temperature": 0.8, "top_p": 0.95, "max_tokens": 100 }

@asynccontextmanager
async def lifespan(app):
    global LLM
    LocalLlamaModel = rh.module(LlamaModel).to(rh.here)
    LLM = LocalLlamaModel()
    await LLM.generate(
        prompt="test", **DEFAULT_SAMPLING_PARAMS
    )  # To load the engine if not already
    yield

app = FastAPI(lifespan=lifespan)

@app.get("/generate")
async def generate(text):
    return await LLM.generate(
        prompt=text, **DEFAULT_SAMPLING_PARAMS
    )
Now you can start your server like any other FastAPI app, but starting the Runhouse API server first:
$ runhouse start
$ uvicorn my_llama_app:app --workers 8 --port 8000
$ curl localhost:8000/generate?text=The-number-of-words-in-this-sentence-is
Fine-tuning Llama 3 with LoRA
One of the benefits of using an open model is that you can fine-tune it with an additional dataset to improve its performance. This could introduce data within a specific field (such as medical information) or data in a specific format used by your application. Runhouse with Hugging Face to train a Llama 3 model on your virtual machines too.
We’ll outline a Runhouse Module that loads the model and a medical dataset, fine-tunes the model using LoRA, and reloads the trained model to run inference with a generate method.
class FineTuner:
    def __init__(
        self,
        dataset_name="Shekswess/medical_llama3_instruct_dataset_short",
        base_model_name="meta-llama/Meta-Llama-3-8B-Instruct",
        fine_tuned_model_name="llama-3-8b-medical",
    ):
        super().__init__()
        self.dataset_name = dataset_name
        self.base_model_name = base_model_name
        self.fine_tuned_model_name = fine_tuned_model_name
        ...

    def load_base_model(self):
        # Configure the model for efficient training
        # Load the base model with the quantization configuration
        ...

    def load_tokenizer(self):
        # Create a tokenizer from the base Llama 3 model
        ...

    def load_pipeline(self, max_length: int):
        # Use the new fine-tuned model for generating text
        ...

    def load_dataset(self):
        # Load the dataset from Hugging Face
        ...

    def load_fine_tuned_model(self):
        # Load the fine tuned model into GPU
        ...

    def new_model_exists(self):
        # Check if the fine tuned model has been created
        ...

    def training_params(self):
        # Configure params for training
        ...

    def sft_trainer(self, training_data, peft_parameters, train_params):
        # Set up the SFTTrainer with the model, training data,
        # and parameters to learn from the new dataset
        ...

    def tune(self):
        # Load the training data, tokenizer and model to be used by the trainer
        # Use LoRA to update a small subset of the model's parameters
        # Save the fine-tuned model's weights and tokenizer files on the cluster
        ...

    def generate(self, query: str, max_length: int = DEFAULT_MAX_LENGTH):
        # Run inference on the fine tuned model
        ...
For the full example and a runnable script, please refer to Fine-Tune Llama 3 with LoRA. We use a small dataset and LoRA for efficiency but you could easily modify the code to try more complex use cases.
Try it yourself
Hopefully you can see how simple it is to deploy Llama 3 with Runhouse and feel ready to try it out for your own specific use case. If you run into any issues–whether it’s general setup or problems with an alternative cloud provider–we’d love to help. Join our Discord server, create a Github issue, or reach out directly to our team via email.
If you come up with an example worth sharing with others, you can submit a PR to our Examples directory as well.
Why We Built Runhouse
We built Runhouse to put the “fun” back into building ML systems. Or, at the very least, to take away the pain of debugging ML deployments and allow you to focus on the fun parts of development (like writing code and actual experimentation). Working with the Llama 3 model is just one of many applications of the Runhouse Python library.
To learn more about our mission at Runhouse, visit our homepage or read our announcement blog post.
Stay up to speed 🏃♀️📩
Subscribe to our newsletter to receive updates about upcoming Runhouse features and announcements.
Read More